As human beings and web consumers, we are exposed to a huge amount of information daily. Our brains are bombarded with so much content that it can be difficult to compartmentalise.
What’s worth absorbing and what isn’t?
When producing original content, it’s therefore important following a certain structure that will help plan and organise it in the clearest and concise as possible. Nothing dissimilar has to happen when you are revisiting your existing content has to be enriched.
Whichever the situation, brainstorming and/or pre-research, think about questions you might be able to ask regarding the topic. And what’s the best way to look for suggestions?
One of the often underestimated sources is the Google Search Console query panel. A bias that is possibly coming from the old days when Google started hiding traffic and keywords.
Why Google Data Studio?
Google Data Studio (GDS) is a free data visualisation tool that lets you build interactive dashboards, and customised, beautiful reporting. I am personally inclined not define it as a BI - Business Intellingence tool - as I found some limitations that make me uncomfortable doing so (e.g. poor in the number of connectors, limited data processing and possibility to bucket data, poor UI), but this is a different story for another post.
That said, I went along it for a couple of reasons: time (always a constraint), and learning curve.
I was, in fact, in need to create some calculated metrics and calculated fields, and I didn’t really have time to read tons of documentation from any other tools.
How do I bucket site queries into the 5 Ws with Google Data Studio?
This post will be not a detailed lecture on how to use Google Data Studio. Since mid-October 2016 (when the tool was released for the first time), I’m sure plenty of people have already covered all the ins and outs of this tool.
In this post, I would explain how to filter the Google Search Console queries for a 5 W question in 5 easy steps. I will go straight for the approach I used, in the hope, you can find it useful yourself in your daily inbound marketing operations.
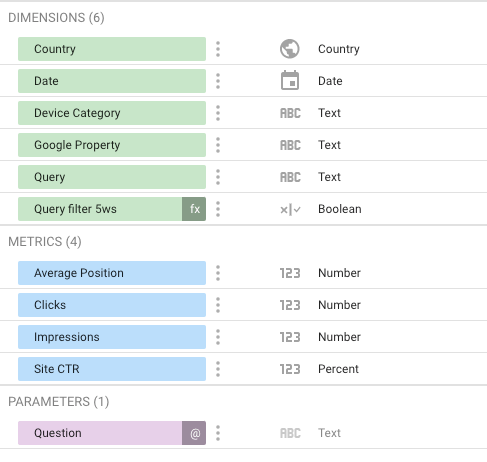
Step one: Connect your data source. Since we are after bucketing queries, in selecting the inner source available out of the official Google Search Console connector, make sure you pick the Site version.

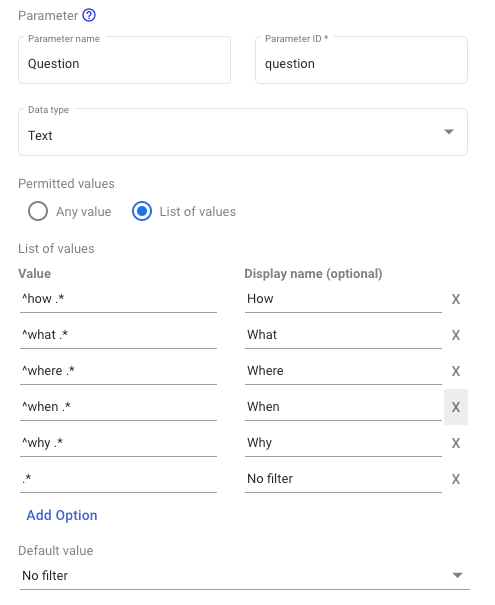
Step two: create a parameter. By the time the source is added, the second step requires you to create a parameter so that you can easily distil the values in the returned data with minimal configuration efforts and coding simplicity. Let me elaborate on this.

To filter queries, I’m going to use the regular expressions, and simplicity was one of the keys for my exercise. I wanted something that I could change (and let other colleagues of mine change) with minimal efforts and need to explain to anybody how the regular expressions work. That’s when I thought of the parameters, so to create a list of values that will feed my query in steroids.
So I ended up creating the questions in this format ^Question .*, for all the questions I needed, so: What, where, when, how, why. Plus I created a generic “All values” whose format is .* that captures everything and kind of act as a reset button.
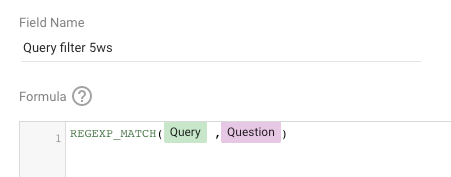
Step three: create the boolean filter. The drop-down list will return GDS only one value at a time, formatted as a regular expression. So the next step is creating a boolean regular expression filter using the regexp_match function which accept two arguments: the Query fields (from the GCS connector) and Parameter fields previously created. With the match, I will verify the query either to contain or not to include the given parameter. Simple as that.

Step four: add the controls, two at very least. A drop-down list and a data table; eventually, you may want to add a date field, just in case you want to use the date as a discrimination point to select your data. Both the drop-down and the data table have to be linked with the data source previously created. The former also requires you to specify the Control field, which in this case has to be the parameter previously created.

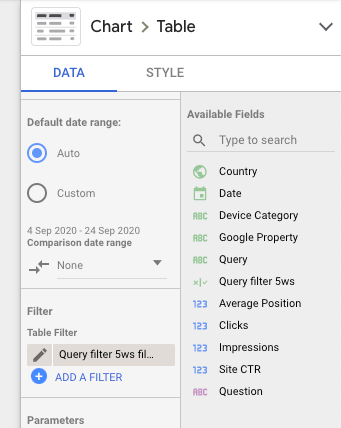
Step five: Apply the filter the data table by amending the Filter section. Here you can create a new filter, which you can name as you want. The values are as follow: Include, then the Boolean regular expression field created at step three, and the match to be equal to True.

And that’s it. By going into view mode, you will be able to slice and dice the Google Search Console queries as you need.

